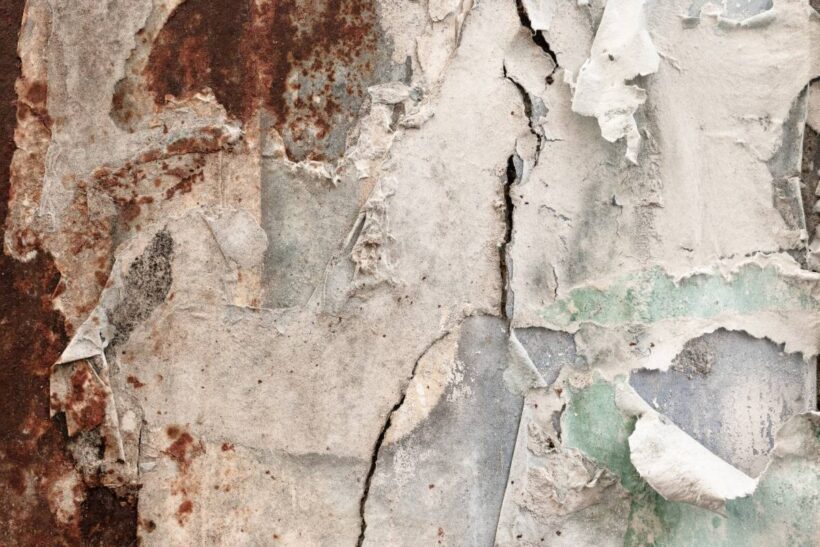
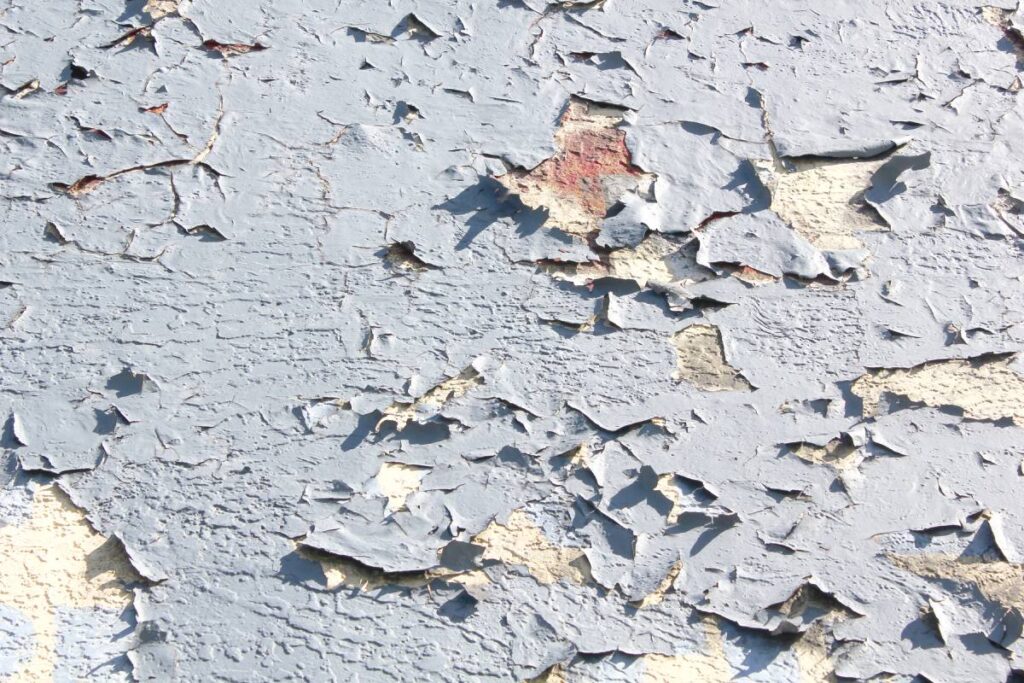
Nothing ruins the aesthetic of a room faster than peeling paint. You spent hours choosing the perfect color and rolling it on, only to see it cracking, blistering, or flaking off months later. It is frustrating, unsightly, and often a symptom of a deeper issue.
Understanding what causes peeling wall paint is the only way to ensure that your next coat sticks for good. Paint failure rarely happens by accident; it is usually a matter of chemistry, environment, or preparation.
While choosing the right shade is exciting, even the most expensive color will fail if the underlying surface isn’t ready. Before you pick up a roller, check your existing walls for signs of failure. It is crucial to identify what causes peeling wall paint—such as humidity or poor adhesion—to ensure your fresh coat stands the test of time.
Below, we dive into the root causes of paint failure and provide a step-by-step guide to restoring your walls.
Table of Contents
- The Science of Adhesion: Why Paint Sticks (Or Doesn’t)
- The 7 Main Causes of Peeling Paint
- Safety Alert: The Danger of Lead Paint
- Step-by-Step Guide: How to Fix Peeling Paint
- Prevention: Ensuring Long-Lasting Results
- Frequently Asked Questions
The Science of Adhesion: Why Paint Sticks (Or Doesn’t)
Before diagnosing the problem, it helps to understand how paint works. Paint relies on adhesion (sticking to the wall) and cohesion (sticking to itself). When the bond between the paint film and the substrate (your wall) is weaker than the internal stress of the paint drying, it pulls away. This results in the cracks and peels you see now.
The 7 Main Causes of Peeling Paint
If your walls are shedding their skin, one of these seven culprits is likely to blame.
1. Moisture and High Humidity
Water is the number one enemy of paint. This is most common in bathrooms, kitchens, and basements.
- The Mechanism: Moisture penetrates through the paint layer or seeps in from behind the drywall. As the water evaporates, it pushes the paint outward, breaking the adhesive bond.
- The Signs: You will often see “blistering” or bubbling before the paint actually peels.
2. Improper Surface Preparation
Painting is 80% preparation and 20% application. If you skipped the cleaning phase, you are painting over dust, grease, or dirt—not the wall itself.
- The Issue: Paint cannot adhere to loose debris or oil (common in kitchens). Gravity eventually wins, and the paint falls off, attached to the dirt.
3. Skipping the Primer
Many DIYers believe “Paint and Primer in One” products are a magic bullet. They aren’t always.
- Why Primer Matters: Primer is a glue-like base coat designed to seal porous surfaces (like new drywall) and provide a “tooth” for the topcoat to grab onto. Without it, the paint soaks unevenly into the wall and fails to bond.
4. Incompatible Paint Layers (Oil vs. Latex)
This is a classic chemistry clash.
- The Rule: You generally cannot paint water-based (latex) paint directly over oil-based (alkyd) paint.
- The Result: The latex paint cannot bite into the glossy, hard surface of the oil paint. It will eventually slide off in large sheets.
Pro Tip: Not sure what paint is on your wall? Rub a spot with a rag soaked in rubbing alcohol. If paint comes off on the rag, it’s latex. If it stays put, it’s oil.
5. Extreme Temperatures During Application
Paint requires a specific temperature range to “cure” (dry and harden) correctly.
- Too Hot: The solvents evaporate too fast, preventing a good film from forming.
- Too Cold: The paint may freeze or fail to coalesce, leading to cracking.
- The Ideal Range: Most manufacturers recommend painting between 50°F and 85°F (10°C – 29°C).
6. Low-Quality Paint
You get what you pay for. Cheap paints contain fewer binders and pigments and more solvents (liquids).
- The Problem: Once the cheap solvents evaporate, you are left with a very thin, brittle layer of film that is prone to cracking and peeling significantly faster than premium brands.
7. Expired Paint
Using that old can from the garage might save money now, but cost you later.
- Shelf Life: Unopened latex paint lasts about 10 years; opened cans last maybe 2 to 5 years if sealed well. If the paint has chunks, smells like sour milk, or has separated beyond repair, throw it out.
Safety Alert: The Danger of Lead Paint
Before you start scraping, pause.
If your home was built before 1978 (in the US) or roughly before the mid-1970s elsewhere, your peeling paint may contain lead.
- Sanding lead paint creates toxic dust that causes severe neurological damage, especially in children and pets.
- Action: Buy a lead test kit from a hardware store. If it tests positive, do not sand it. Contact a professional lead abatement specialist.
Step-by-Step Guide: How to Fix Peeling Paint
Once you have identified the cause (and ruled out lead), follow this protocol to repair the wall.
Tools Needed:
- Putty knife/Scraper
- Sandpaper (120-grit and 220-grit)
- Spackling compound
- High-quality Primer
- Premium Interior Paint
Step 1: Remove the Loose Paint
Lay down a drop cloth. Use your scraper or putty knife to gently remove all flaking, peeling, or blistering paint. Don’t force it, but ensure everything that wants to come off, does come off.
Step 2: Sand the Edges
Where the bare wall meets the remaining paint, there will be a sharp ridge. Sand this transition (feathering) until it feels smooth to the touch. This prevents the outline of the old patch from showing through your new paint.
Step 3: Clean the Surface
Wash the area with a sponge and a solution of warm water and mild detergent (or TSP substitute for greasy areas). Let it dry completely. Do not paint a damp wall.
Step 4: Patch and Prime
If the peeling caused deep divots, apply spackling compound, let it dry, and sand flat.
- Handle Extensive Damage: If the peeling has revealed significant plaster damage or uneven drywall that requires a “Level 5” finish, DIY patching might show through. In these cases, consulting specialists like Pro Plaster N Paint can ensure the underlying surface is perfectly restored before you apply the final coat.
- Crucial Step: Apply a high-quality primer to the bare spots. If you had moisture issues, use an oil-based stain-blocking primer.
Step 5: Repaint
Apply your topcoat. For the best finish, paint the entire wall rather than just spot-painting, as color matching aged paint is notoriously difficult.
Prevention: Ensuring Long-Lasting Results
To ensure you aren’t reading this article again in a year:
- Ventilate: Install or upgrade exhaust fans in bathrooms to reduce humidity.
- Wait Between Coats: Follow the “re-coat time” on the can. Painting too soon traps solvents from the first coat, causing bubbles.
- Buy Quality: Spend the extra $20 per gallon for premium paint with higher acrylic content.
Frequently Asked Questions
Q: Can I just paint over peeling paint? A: No. The new paint will bond to the old, peeling paint, not the wall. When the old paint lifts, the new paint will fall off with it.
Q: Why is my paint peeling off like rubber? A: This usually indicates a loss of adhesion where latex paint was applied over a glossy or dirty surface without priming. It peels in stretchy sheets because the latex film is flexible but not bonded to the wall.
Q: How do I stop paint from peeling in the bathroom? A: Use a paint specifically formulated for bathrooms (often labeled “mildew resistant” or “high gloss”). Ensure your exhaust fan is running during showers and for 30 minutes afterwards.
Is your home showing signs of wear? Tackling peeling paint is a manageable weekend project that restores the beauty and value of your space. With the right prep, your walls will stay smooth for years to come.